

Before you begin
- Admin or organization-owner access to your Hightouch account
- Your organization’s SSO provider details (if using SSO)
- Your marketing team’s first use cases. See the examples for lifecycle and paid media teams.
Setup steps
Learn the building blocks
Before configuring anything, learn how Hightouch is organized: organizations, workspaces, user groups, roles, environments, and Spaces.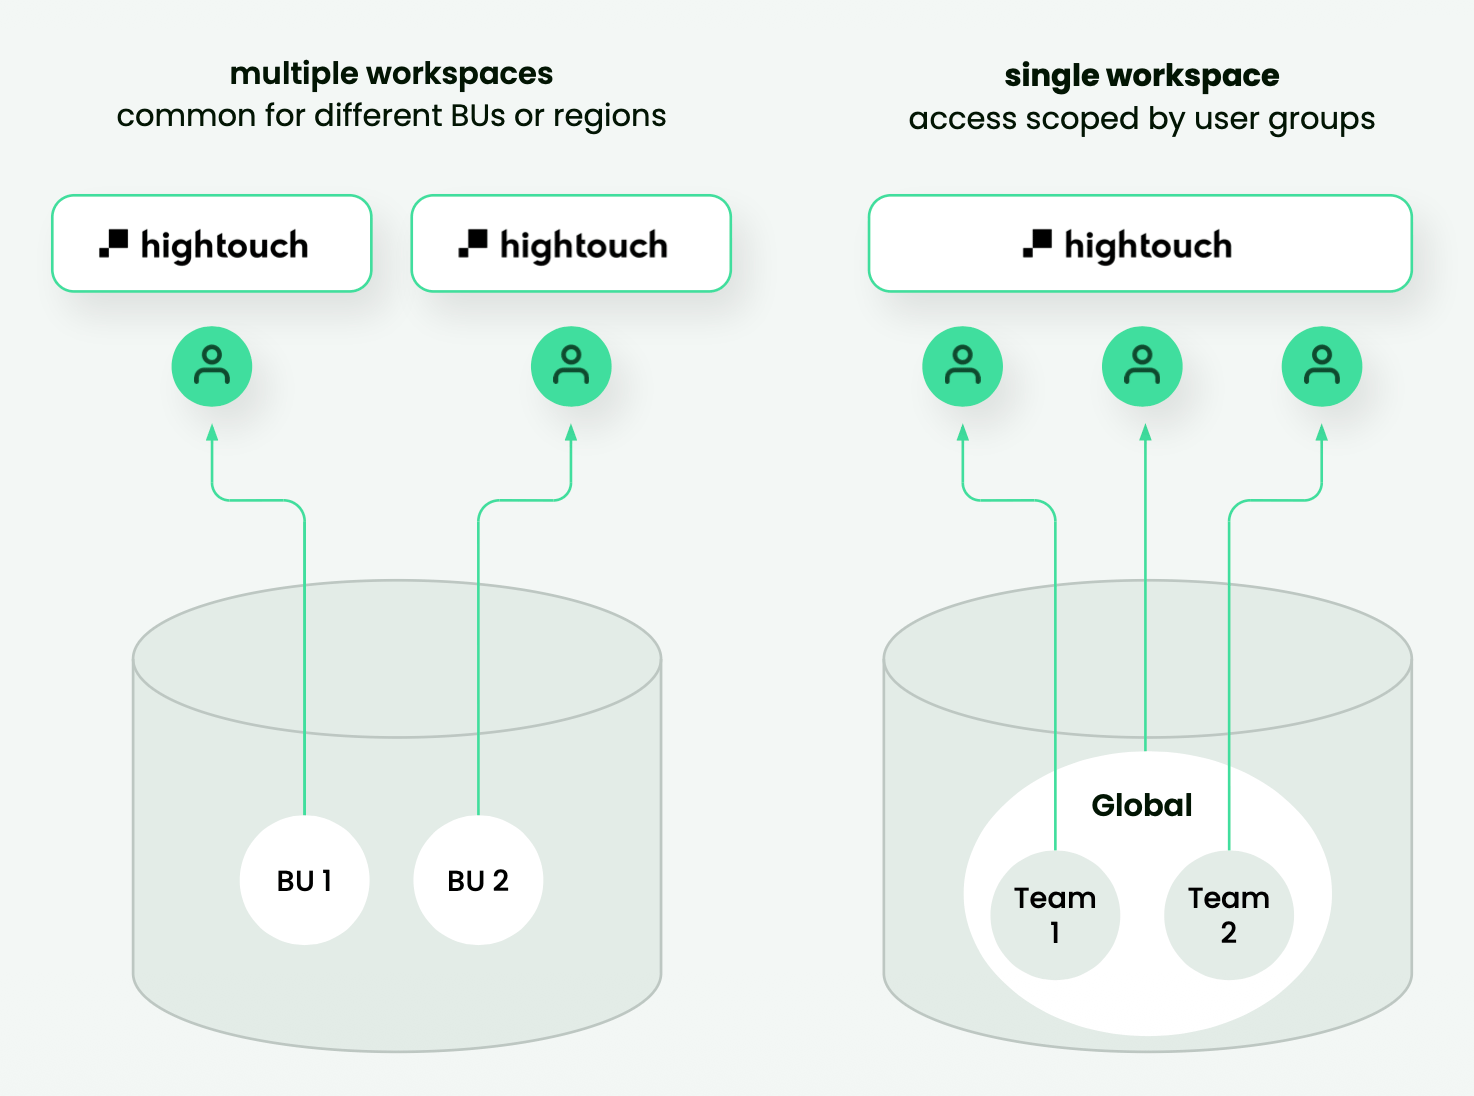
Decide your workspace structure
Decide: whether teams share one workspace or work in separate ones.
Then set up your organization and first workspace. Choose a region, pick a workspace name and slug, and work through the onboarding checklist. To compare workspaces and environments side by side, see Do you need another workspace?
Set up sign-in and access
Decide: how people sign in, how you group them, and what each group can do.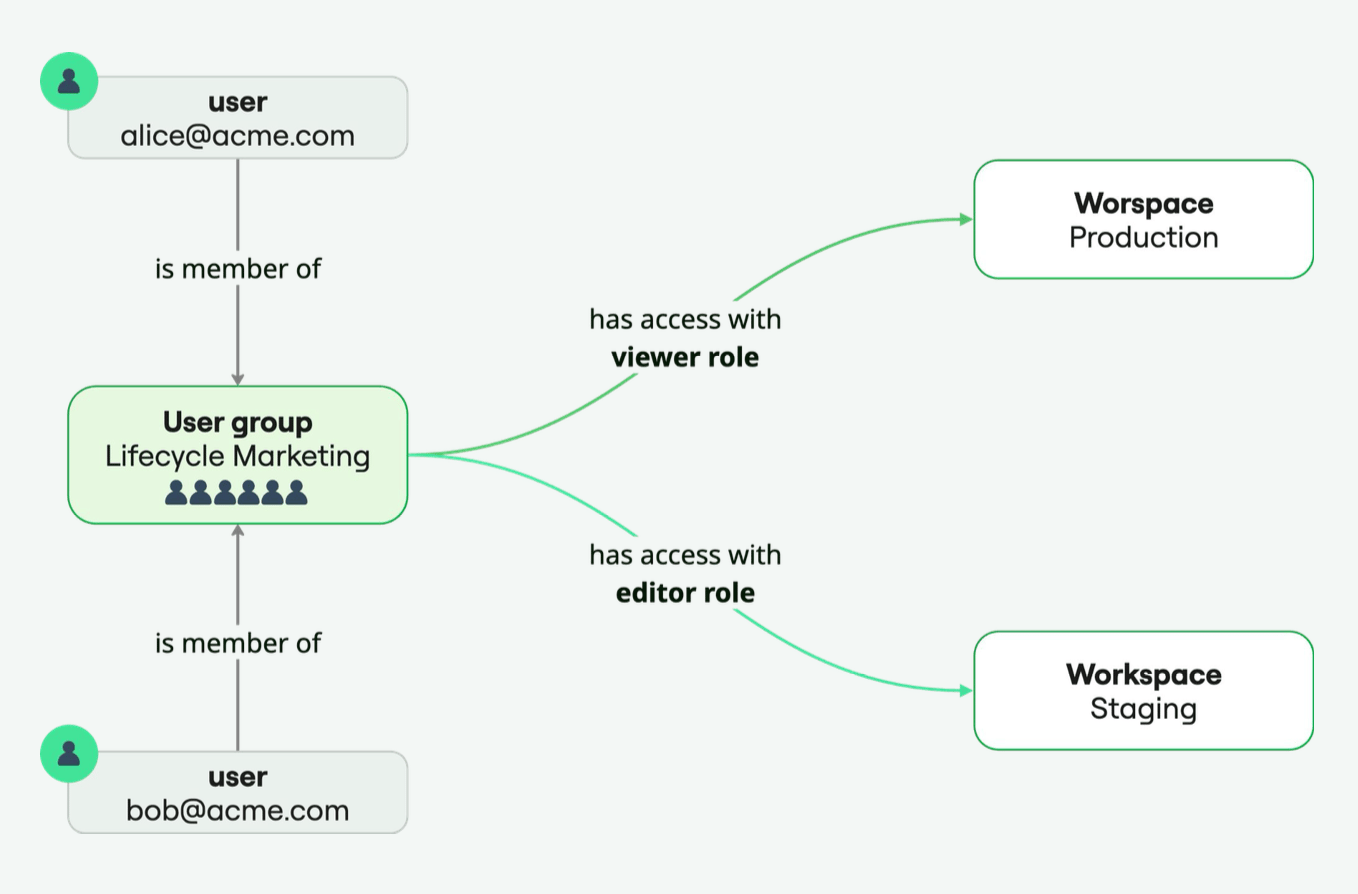
Assign roles to groups, not individual users. A user in several groups gets the highest access any of their groups grants.When you roll out SSO:
- Copy the SSO URL and Audience URI exactly from Hightouch. Small typos cause login loops.
- Plan which identity provider groups map to which Hightouch groups before you turn SSO on.
- Test with two or three users before inviting everyone, and keep an admin signed in on a separate browser session in case you need to fix the setup.
Choose governance for your team size
Decide: which controls your team needs now. Start with the tab that matches your organization, and add controls as you grow.Some common situations and the controls that handle them:
- Smaller teams
- Growing teams
- Larger or regulated teams
A few people share one workspace and trust each other’s changes.
- Your workspace structure, user groups, and pre-built roles from the previous steps are enough to start.
- Add audit logs to your routine so you can see who changed what. They cover 90 days of activity.
Secure your infrastructure
Decide: where Hightouch stores customer data at rest, and how it reaches your systems.Set up self-hosted storage so customer data at rest stays in a bucket in your own cloud. It’s required on the Business tier, so set it up before your first sync. Adding it later means resyncing existing syncs. Your IT team usually provisions the bucket. Then configure the rest as your security requirements call for:
- Security overview: Encryption, compliance, and hosting details.
- Networking: Tunnels, PrivateLink, and IP allowlisting. Your data team needs this to connect a warehouse in a private network.
- Warehouse Sync Logs: Write sync history to your warehouse.
Set up agent access and Context Hub
Decide: who can use agents, who maintains the context they work from, and which context to add first. This step applies if your team uses Agents, Ad Studio, or Lifecycle Studio.
You don’t need to configure all of Context Hub before teams start. Add context for one use case, review what agents produce, and expand from there.
Prepare Native Delivery (optional)
If your team sends email, SMS, or push from Hightouch with Native Delivery, work through Prepare for your first send with your Hightouch team and your data team before the first campaign.
Organize resources (optional)
Decide: how teams will find their work as the workspace grows.Set up a folder structure early, organized by team or region. Only workspace admins can change folders, so agree on the structure before teams start building. Use labels for things folders can’t capture, such as campaign type (
type:email) or brand (brand:brand-a). Folders and labels help teams find resources. They don’t restrict access.Troubleshoot common setup issues
These are the setup questions admins ask most often.Readiness checklist
Before marketers start working, confirm the workspace is ready.- Workspace created in the right region
- SSO tested with a few users before rollout (if you use SSO), and at least one admin can still sign in if something breaks
- User groups created, with a role assigned to each
- Governance controls for your team size are in place (step 4)
- Self-hosted storage set up, so customer data at rest stays in your cloud
- Networking meets your security requirements (if your policy requires changes)
- If your team uses agents: Access Agents and Configure Agents granted where needed, and Context Hub owners assigned
- If you send with Native Delivery: Prepare for your first send is complete
- A marketer’s account can sign in and see the right workspace, Spaces, and data
- Your data team has finished the Data setup readiness checklist
In smaller teams, one person may own both platform admin and data team responsibilities. The checklist above is organized by responsibility, not job title.
Next steps
- Data setup for your data team to connect sources, configure sync infrastructure, and define the schema.
- Lifecycle marketing for lifecycle marketers to build audiences, run campaigns, and measure results in the workspace you set up.
- Paid media for paid media marketers to create, refine, and launch ads with Ad Studio.